Showing posts with label recipe. Show all posts

Friday, November 15, 2013

All of the Pesto!

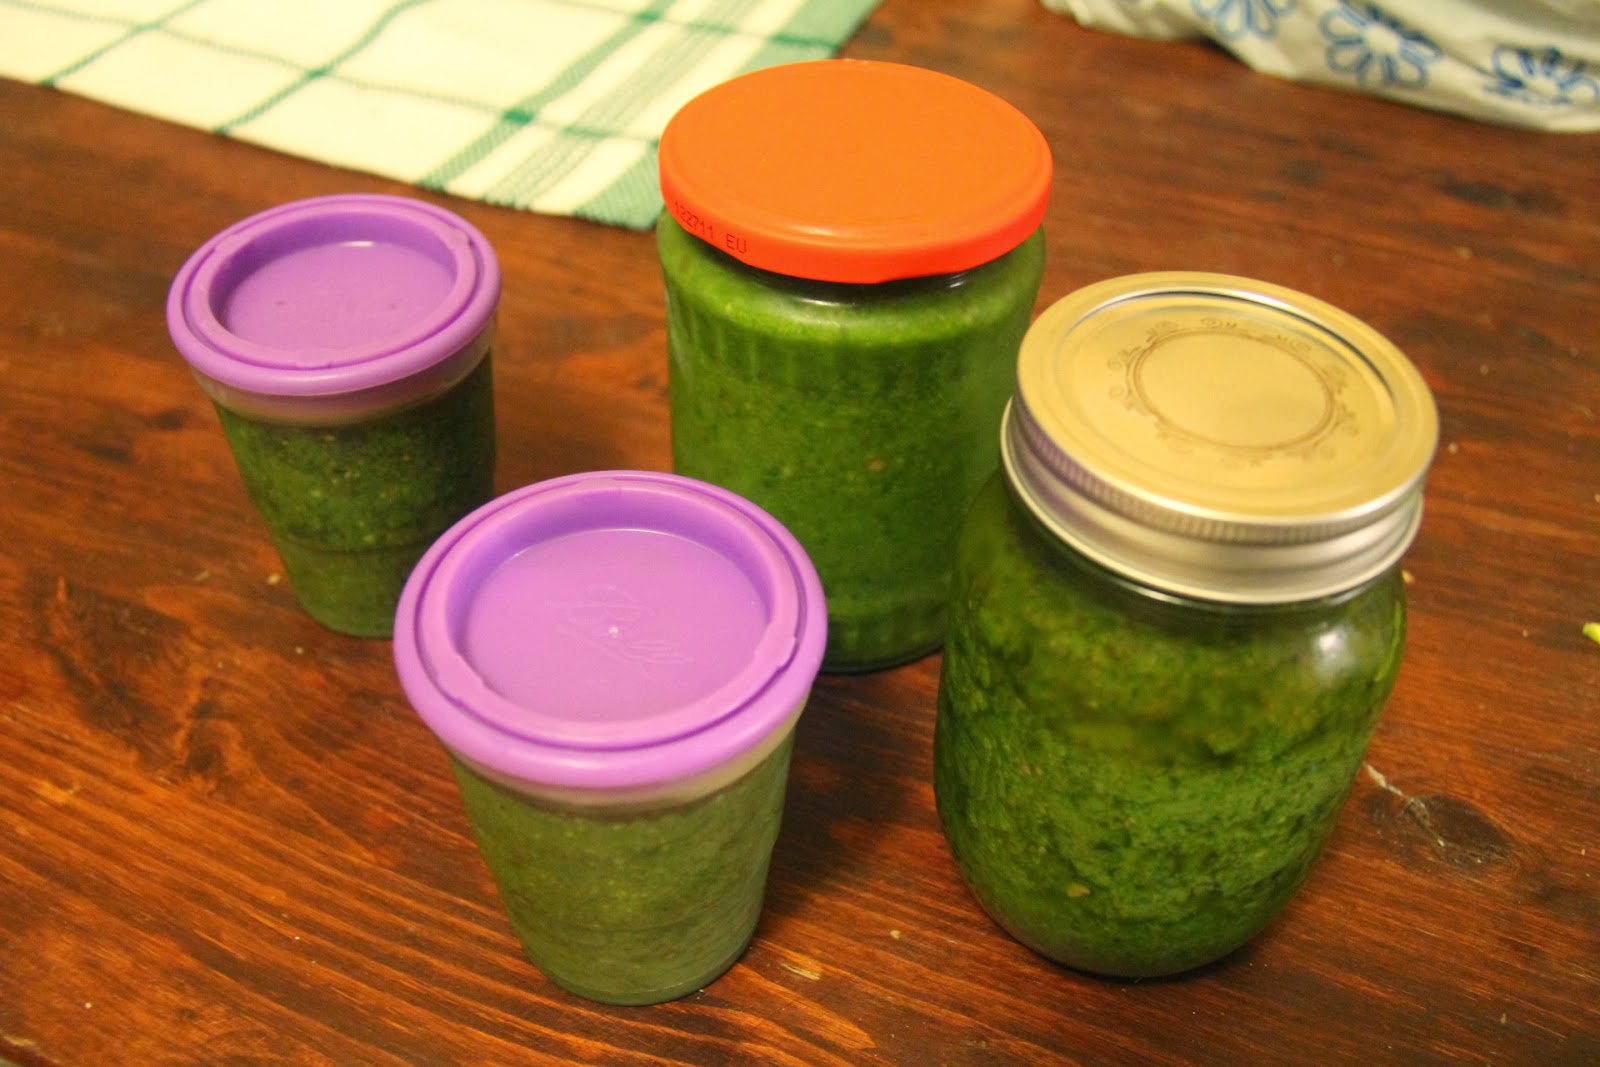
Derick was cleaning out his garden before the first frost hit for him and he had CRAPLOADS of basil.  I bought a bunch off him for $2 and had a pesto-making fiesta. First I washed it all and took it off it's stems.  
 I threw it in a blender with some fresh grated parmesan cheese, fresh ground pepper, sunflower seeds (could use pine nuts or walnuts or pecans), and lots of good olive oil.
Blend away and cover immediately with a layer of olive oil so that the pesto doesn't oxidize. It still tastes delicious when it does but it's not the prettiest...  (think guacamole gone brown)
I've frozen three and one is in the fridge for immediate cooking deliciousness :)

Monday, November 4, 2013

Self-Care Hiatus Update and Plum Crumble

In continuing my work, I have decided that the only way I can keep this up sustainably is in occasional posts. I have burnt out for the second time in a year and it doesn't make sense to destroy myself over this.  To share stories of mindfulness and sustainability, I need to ensure I am living a mindful and sustainable life first. Otherwise, what am I sharing?
To illustrate my thought, here's a deliciously simple crumble I worked on a few weeks ago with gorgeous Ontario plums:
1/8th the plums and mix them with some sugar and lemon juice in a pie dish
Crumble softened butter with organic oats, sugar, cinnamon, and ginger in a bowl
Top the plums with the crumble and bake on 350C until you see fruit gurgling out the sides (I think around 40mins)
 This is what happens when you rush to try to plate and photograph a beautiful dessert.
Mindfulness. I'm slowing down. Thanks universe.

Wednesday, September 11, 2013

What to Do with Stems from Greens

I made a delicious recipe one day and it's my new favourite for getting rid of stems from kale, chard, spinach etc. Don't throw them away!!  People throw them out, did you know? It's crazy! Don't waste perfectly good food!
Steam the stems until partway cooked.
Blend fresh tomatoes into a sauce or use a can/bottle of passata.
Blend the two together in a casserole dish, top with cornmeal (my gluten free version) or breadcrumbs and grate cheese on top.
Bake until cheese in melty delicious and enjoy!

Tuesday, September 10, 2013

Fresh Bean Salad Recipe

A surprise! The tastiest bean salad I ever remember making!

I BBQ'd 2 ears of Ontario corn and a half of my overgrown pattypan squash, brushed with oil
I steamed approx. 3/4 cup of my own green beans in a shallow layer of water in a covered pan
In the same water I steamed approx. 3/4 cup of Ontario romano beans in water until tender (approx. 5 mins)
As that was all cooking, I diced a small white onion from Derick.
Dressing:
Into the bean steaming water I added
Lemon juice (approx. 2 tbsp)
Sunflower oil (approx. 4 tbsp)
Crushed whole coriander seed (approx. 2 tsp)
Minced fresh ginger (approx. 2 tbsp)
Minced fresh garlic (approx. 2 tbsp)
A pinch of cayenne Pepper
Paprika (approx. 1 tsp)
YUM

Saturday, August 31, 2013

Tomato Season!

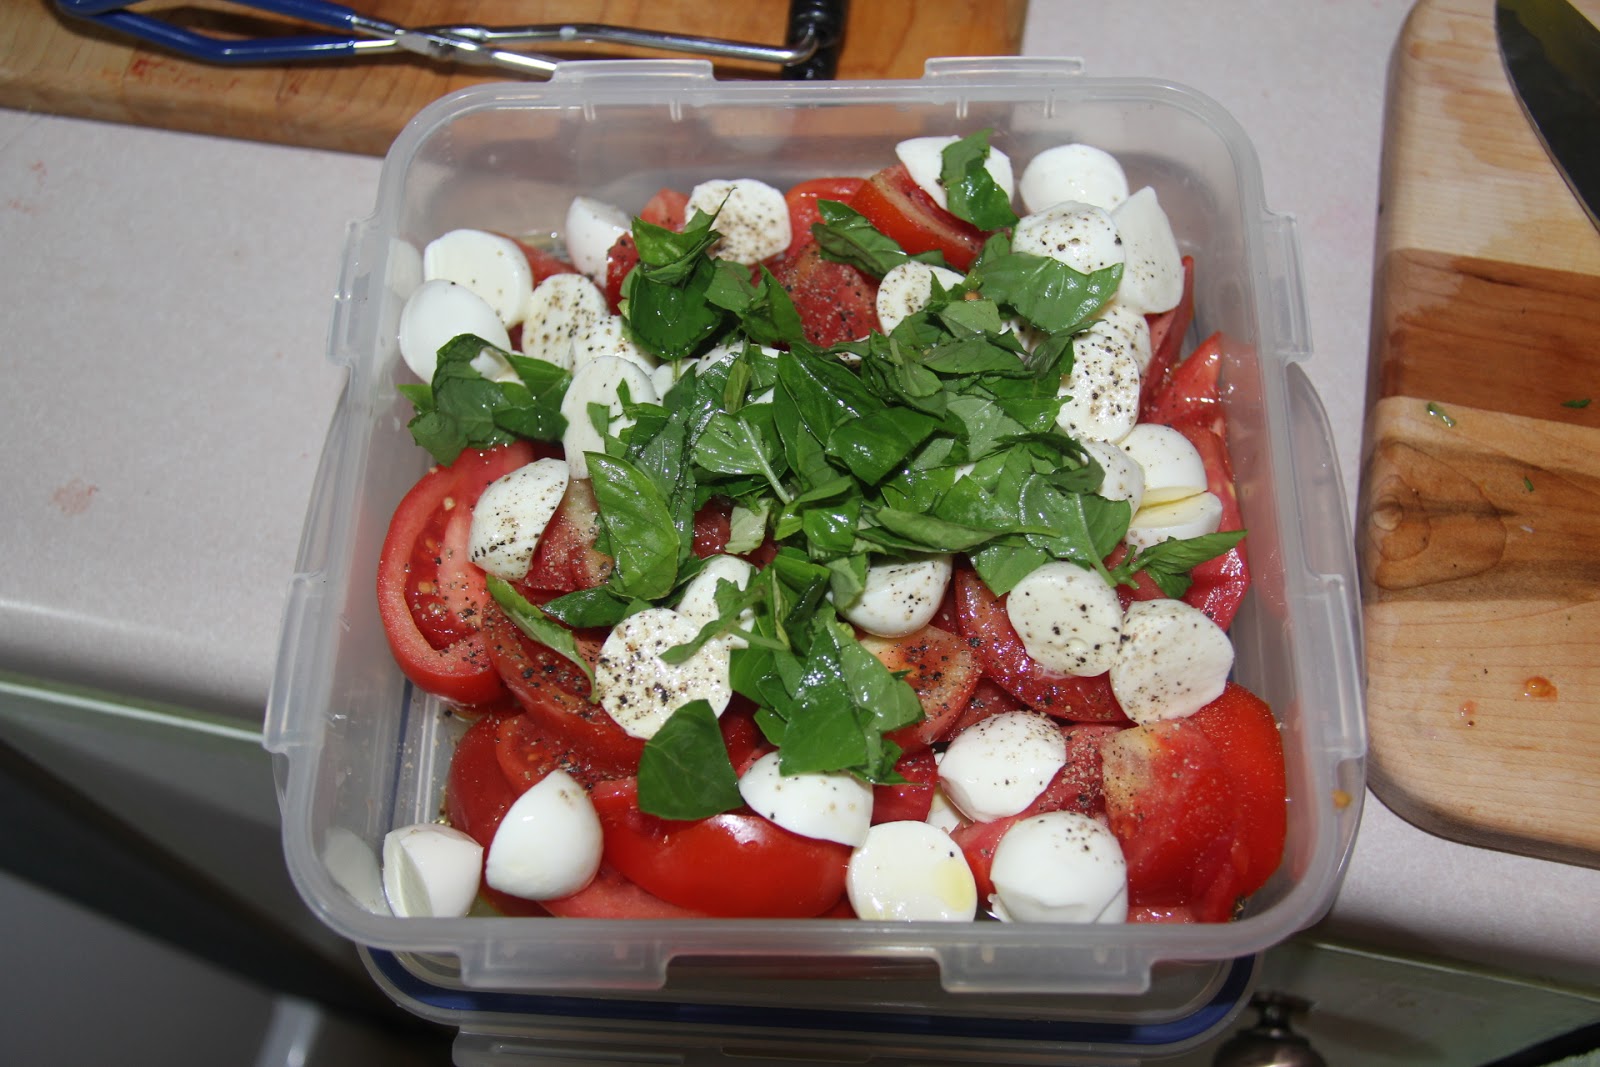
Yup it's tomato season. I have a glut of basil in my garden (mmmm) and got a basket of tomatoes from my grandfathers garden today (mmm). What did I do?  Easiest recipe ever!
Cut up tomato, mini bocconcini, ripped up basil, a pinch of salt, fresh cracked pepper, extra virgin olive oil.  YUM!!

Friday, August 30, 2013

Apple Butter–Part 3!

In finally getting to can the apple butter, I washed some small jars, heated up my big canning pot about 1/4 full with water, boiled my jars for 10 minutes, then put them aside on a cutting board (using the super fun jar lifter) to fill hem with goodness!  
I had reheated my apple butter in a pan to not shock the glass into breaking (cold butter+hot jar=danger) and boiled my lids in a small jar for 10 minutes. I grabbed the funnel that came with my canning kit to spoon the butter into the sterilized jars and poked it with the back of the nifty little headspace measuring device to release any air bubbles that might come to the surface when processing.  I made sure each jar had 1/4 inch of headspace to the rim, wiped the rim down of any butter that may have caught the rim, and used the nifty magnet stick to put a sterilized lid onto each jar.  I lightly screwed on a ring to each jar and processed them in the hot water bath for 10 minutes.  Out they came and voila!! Deliciousness canned!
The beautiful final product!!
Kind of unbelievable that that many apples made this little apple butter.....  Granted, one jar did break in the hot water bath :(, I gave some butter to my mum before processing, and I ate a bit of apple sauce when it was sauce but STILL.  Super concentrated apple sweetness! And the spices make it taste like pie!!!  A new favourite!

Thursday, August 29, 2013

Apple Butter–Step 2

Step 2–Apple BUTTER from the apple sauce!
So my apple sauce looked a bit like this after cooking and I needed to get out all the peel before simmering further.  Apple skin has it's own pectin so apple butter doesn't need it–pretty nifty! But skins, not so tasty when everything else is mush....
I don't have a "food mill" (still not quite sure what that is...) but some makeshift ladle mushing action in a sieve worked pretty efficiently.
I simmered it down with "some" sugar, cinnamon, cloves, nutmeg, and ginger.  My recipes work by dumping and tasting....  Who measures?! Putting the stove on medium heat made the apples bubble like mad and shoot burning hot apple sauce at me...  It wasn't nice....  I eventually figured out how to lift the lid like a shield and stir with a LONG HANDLED SPOON.  In the recipe I found it said kids were great to do the constant stirring. I see how things used to be. Apple butter must have been punishment for not doing their chores! In any case, I didn't stir consistantly, just every once in a while and I didn't have anything stick.  Frankly I simmered in batches, turning the stove of occasionally when I had to go run an errand/have singing practice. I finished cooking it down when if I scooped up a spoonful and tilted the spoon, it didn't drop for a moment.  I'm letting it cool overnight to put in the fridge in the morning to can tomorrow!  Baby steps!

Wednesday, August 28, 2013

Apple Butter–Part 1

After my Not Far From the Tree apple pick, I haven't had a big chunk of time to make apple butter so I have to do it in steps!! I found this recipe which I'm going to follow in the way that I follow most recipes... Not very well, haha
http://easteuropeanfood.about.com/od/fruits/r/applebutter.htm
Today was step one–apple sauce
I washed my apples in the sink with some apple cider vinegar. What a beautiful sight!
It's been a few days since I picked and it's been pretty humid so this has started happening...  Needless to say I spend some time cutting out all the mush and worms and cores.
I cooked the whole pot of these down with 3 mason jars of water until it looked like apple sauce–voila! Free apple sauce! Step 2 to come...

Saturday, August 24, 2013

Cooking My Potatoes!

Olive oil, salt and pepper.  350 degree toaster oven. 30 minutes. That's all they need..... SO TASTY!!

Thursday, August 22, 2013

Steamed Greens Dinner


I made a delicious and super simple dinner tonight. I picked some beautiful big kale and chard from my garden and washed it well.
 I steamed the stems first for a minute, then added the greens for another 30 seconds. I transferred it to a bowl, poured a bit of dressing on it (tahini, sesame, ginger, lemon juice) and some fresh sesame seeds.  I then ate it with 2 "dipping sauces"–siracha sauce and tahini!  A beautiful fresh easy meal :)

Sunday, August 18, 2013

Saturday, August 10, 2013

Home-Made Vanilla


I had recently collected three of the perfect sized glass juice bottles to make vanilla extract in from the grocery store. I took three bourbon vanilla beans per bottle and sliced them lengthwise to expose the seeds and placed them into the bottles.  I then filled the bottles with vodka, put the lids on and will leave them be for a few months!  Time taken to make–maybe 10 minutes.  Will it be worth it? Probably!!

Saturday, August 3, 2013

A Run of Recipes...

So I seem to be cooking a lot this week... Those whole spices really inspired me. I decided to make a nice big warming pot of rice pudding today. After cooking the brown rice as per the cooking instructions, I added a can of Organic coconut milk to the pot as well as a whole cinnamon stick, some whole cloves, a vanilla bean, and a few cardamom pods to simmer down with the milk. I should have though of putting them in right from when I was simmering the rice in water–oh well, next time.
 After it was ready, I topped it with beautiful local cherries and organic maple syrup from Quebec. HO-LY DELICIOUS!!

Friday, August 2, 2013

The Perfect Omlette

How to make the perfect omelette:
-Make sure you add a bit of milk to the egg and beat it until it is foamy then let it SIT for a minute or two before you cook it so that it stays nice and fluffy.
-Put lots of butter in the pan and push the egg into the centre of the pan with a spatula so that the uncooked egg keeps running to the pan along the edge.
-When it's just about done (no more runny egg around the edges), put whatever ingredients you want on the inside (I did tomato, avocado, mushroom, goat cheese, and basil from the garden).
-Fold it over and let it sit for a minute to finish cooking before serving–DELISH!

Serve that with delicious locally made red pepper and garlic jelly on cream cheese on top of Molly B Gluten's locally made pumpernickel bread and farmers market breakfast sausages with a beautiful cup of tea–golden!  This is how I keep myself centred–a leisurely breakfast of beautiful food on the porch in the morning :)

Thursday, August 1, 2013

Savour Whole Spices...

Sometimes I just get excited about food and feel the need to share...  I think a big part of reconnecting to your food is taking time to really work with your ingredients.  Although none of the ingredients here were local except the garlic, bay leaf, and carrot, I spent the time nourishing myself–a totally worthwhile endeavour. And should totally happen, wherever your ingredients are from.
I started by dry frying the crushed spices-cinnamon stick, cardamom pods, coriander seed, fenugreek, and peppercorns.
 When the smell seeded almost too much to handle, I cranked the love up to 11 and added fresh garlic and ginger to the mix.
 I then added the bottle of passata, coconut milk, bay leaf, curry leaf, and vegetables (sweet potato, onion, and purple carrot) and let it simmer until the veggies were soft (around 40 mins).
Beauty!  Savour spices in their whole form–it elevates basic ingredients to heavenly heights!

Tuesday, July 23, 2013

Cherry Preserving

I finally got around to preserving my pitted cherries (I needed to pick up the brandy first! I soaked the jars in hot water while I set everything up and filled the jars with cherries. I filled in the cracks approximately 1/3 of the way with raw organic sugar and topped it off with brandy.  I shook it a few times to As long as the berries are covered in alcohol, they won't spoil. I put them in my bedroom to marinate for a few months, some to keep for myself, some to give as presents.  Delicious boozy cherries and delicious cherry liqueur?  What's not to love?

Friday, July 19, 2013

Fermenting Ontario Garlic Scapes and Red Cabbage

 My friend Bozena had been on a short internship at a farm and came home with a whack of garlic scapes.  There being a massive heat-wave in Toronto and no air conditioning in my house, I had no desire to turn on the stove and pickle.... So we decided to ferment!
We separated out the woody stems (to compost) from the beautiful curls (to line the jar) and diced up the small pieces to put in the middle of the jar. Then, the fun part!
We also cut up a beautiful red cabbage that I had bought and didn't have time to cook.
Recipe: veg, 1/4 cup sea salt (in a large mason jar), water (I forgot to leave out water to dechlorinate it, so we just used regular tap water). In the cabbage, we also added some peppercorns and some carraway seeds.
Cover the jars with parchment paper so they can breathe and leave them on the counter for a few days. Depending on the heat and your personal tastes, it can be ready within a week or in much much longer! Fermented veg will keep for months–the more salt and the cooler the temperature, the slower the fermenting process.  I love fermenting!  So easy!  
On a side-note, we also made a beautiful salad with fresh lettuce from my garden and fresh radishes from hers :)

Wednesday, July 10, 2013

Bed Clear-Out and Epic Pesto-Making Session!

I pulled out all my radishes today to clear out the bed and make room for winter veg. I separated out the leaves and flowers to put into a pesto and discarded the stems.  I didn't have much luck with the actual bulbs though...  Soil was too depleted.  Going to add some good stuff to the soil before I start next–make my winter veg a bit happier!

Radish Top and Garlic Scape Pesto:
Blend radish tops, garlic scapes, raw sunflower seeds, fresh ground pepper and enough olive oil to allow the blender to run.  Voila!  
I kept some in a jar in the fridge and froze the rest.  Delish!

Tuesday, July 9, 2013

Currant, Raspberry, and Mint Cocktail


I had a bunch of raspberries from my mums garden and some fresh currants from the market in my fridge when I came home from a rough day at work.  I wanted a refreshing cocktail and made a very successful one!  I muddled the fruit with some fresh mint from my garden, added some Tanqueray gin (the only gin I can stomach…) and some sparkling water. Yum! Farm fresh cocktail!

Tuesday, July 2, 2013

Nettle Tea

I put my dried nettle into a jar yesterday and decided to make a pot of tea for my somewhat unhappy tummy...  Instead of just steeping it for 10 minutes like regular herbal tea, it's best to boil the leaves, covered, for 10 minutes (I'm not sure why, it's what I was told by friends who do the same...  I realize I'm more folky than I used to be, listening to a lot of information passed on from experience in addition to info learned in that book-learnin' place...)
 I took the boiled nettle and added, chopped up, it to a soup I made.
The soup was delicious!  I started by frying up a bunch of onion, celery, carrot, potato, and garlic that I had hanging around, which needed to be used.  I added some cayenne, lovage, tahini, cilantro seed, salt, fresh ground pepper, and the nettle, in addition to some mushroom and broccoli broth that I had in my fridge from prior soup-making and some regular organic chicken broth and voila!  Delicious soup!